
Vehicle camouflage
The first area is actually cutting vegetation (branches and leaves) and applying it to our vehicles. Too often the Army in peacetime with a "we-have-to-turn-this-in-to-the-wash-rack-in-a-few-days" mentality fails to camouflage vehicles whatsoever. This makes them stick out as easy RPG and ATGM targets and makes it easy for snipers to zero in on crewmen.

It should be unit SOP for every U.S. Army unit to camouflage and sandbag-harden ALL vehicles. We realize the American non-chalance mitigates against this, but it must stop. In WWII, and later on in Vietnam when avoiding enemy fire became a survival imperitive, American crews began to camouflage their vehicles--too late. It needs to be SOP today. Instead of chowing down on an MRE, get an ax or an E-tool and chop some vegetation and 550 cord it to your vehicle.
Notice how well-camouflaged these German PanzerGrenadiers are!
The British Light Dragoons in Afghanistan have camouflaged their Scimitar light tanks well:
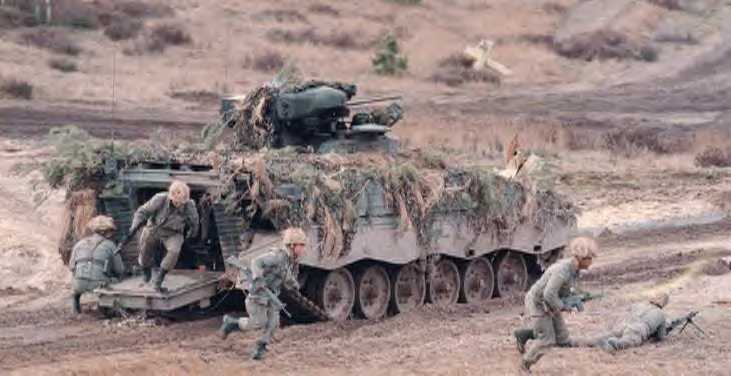
The next level of camouflage will be semi- or permanently applied ghillie-type strips to render vehicles invisible to Forward Looking infared (FLIR). Some cut up camou nets as depicted above. When done systemically it can render the vehicle FLIR invisible. The Russians already have heat-reflecting covers offered on their armored vehicles like their 2S23 self-proppelled 120mm mortar:

Western firms that offer FLIR products
www.x20.org/library/thermal/desert_fox.htm
Such means area already available from Barricuda and Marconi of Sweden and Texas.
www.barracuda.se/tinfrared.html
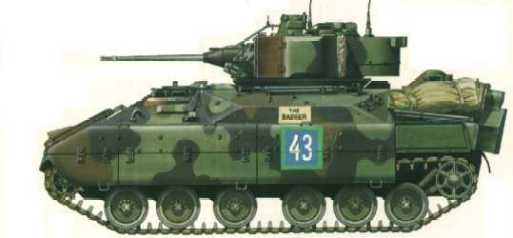
Its important to balance camouflage with some identification markings so we can figure out which vehicle is which in the assembly area---a small panel section in the center with space for the ID number could be used without compromising camouflage.
The point of camouflage is so at a distance the vehicle can blend in with the surroundings and not become a target/aim point. We need this capability when on THE MOVE since we cannot afford to stop and erect a camouflage net with poles which takes hours to erect.
Vehicle crewmen camouflage
Once the vehicle is camouflaged, the heads and torsos of crewmen sticking out need to be camouflaged. The problem is these Soldiers have to be able to duck in and through narrow hatches and this limits what we can do.
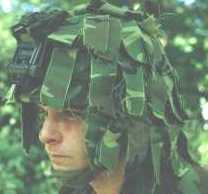
One thing we can do is take a PASGT Kevlar helmet cover and place it over the detachable shell part of the Combat Vehicle Crewman (CVC) helmet and glue the ends down to change the shiny, smooth surface OD Green color to camouflage. This almost zero-cost addition can be done TODAY by all U.S. Army units. The helmet cover has slots to add natural vegetation twigs. Use only Medium/Large covers for this application.


The CVC shell should be the ballistic-protective types when obtained.
CVC Ballistic Shells
Medium 8470-01-389-3815 MIL-H-44117 Fits Small and Medium CVC helmets
Large 8470-01-389-3821 MIL-H-44117 Fits Large CVC helmets
http://www.specialtydefense.com/flyers/cvcstandard.htm
Size.........NSN #....... Fits Sizes
Small 8470-01-130-8180 Up to 6 7/8
Medium 8470-01-130-3794 7 - 7 1/4
Large 8470-01-130-3795 Over 7 1/4
All vehicle crewmen should wear Nomex fire-resistant jumpsuits and Kevlar body armor as SOP in peacetime and in war to acclimatize them to the extra weight and protect against vehicle accidents.
CVC helmet/NVG interface
Another problem encountered with CVC helmets is the AN/PVS-7B Night Vision Goggle (NVG) strap-on mount doesn't hook on securely. Resultingly, some BFV crews have been wearing NVGs dangling around their neck, lifting them up to their eyes to look at objects, tying up hands which should be free for other tasks. A wily enemy will be long gone before the BFV crewman can place the NVGs up to their eyes---NVG surveillance has to be continuous in order to see the enemy first.


The solution as it is with the PASGT Kevlar helmet when not wearing a MILES halo---is to drill a hole in the CVC shell center after covering it with a helmet cover and bolting the NVG mount to it to eliminate the strap and possibility of it falling off if the buckle unclips. The photo above shows the procedure to bolt the NVG mount to the PASGT Kevlar helmet and can be applied to the CVC helmet by placing the mount on the center front, marking the hole with a pen and then drilling through so a bolt/lock washer/nut can be fastened to secure the NVG mount. This can be done NOW even though the NVG mount is with the NVGs in supply in their case. The Bolt/washer/nut can be attached to the CVC shell awaiting its use to secure the NVG Mount. Some GOOD news to report: I found the Kevlar helmet screw and chin post nut (U.S. Cavalry Store parts # 0911000280004 and 0911000100000 .70 cents each or NSN through Army supply system) will secure the NVG mount to the front center of the CVC. See photos below. A longer screw/bolt and nut combination will be needed when/if we get the thicker, ballistic CVC shells. I used a hammer and a nail to punch through the thin non-ballistic shell and the screw cut its way through when turned to secure the mount (it can be done in the field with minimal tools). A drill will work faster for mass production.
However, if you are in a force-on-force training situation using MILES gear you will need the strap to wear over the helmet HALO by the FRONT of the NVG mount going on the outside of the the HALO and brow of the helmet, yet UNDERNEATH the MILES HALO at the back lip of the helmet using the plastic "U" clip. You will need 100 mph tape to secure this less-than-ideal set-up.
Secure NVG mounting to the CVC via the center bolt will insure the vehicle crewman can see outside, head-out with the best possible image intensifier capabilities.
The absolute best solution to this problem would be a vehicle communications-capable Kevlar helmet with sound proofing that can be lowered over the ears or taken away by a switch/lever. Then vehicle crews would have to wear only one helmet and not have a different dismount-the-vehicle-fight-on-foot helmet bouncing around in side the vehicle, cluttering it up and making itself unavailable when needed.
Dismounting Infantry Camouflage
Much is already known about this area since its life/death for the man fighting on foot. However, over the years we have lost the "ragtop" Kevlar helmet cover-level of camouflage in favor of a peacetime-Army garrison look where the Soldier's last name and rank insignia (blood type is a wise inclusion) are sewn or marked on the helmet front. Recent combat FTXs where night vision devices are widely used show that the lack of helmet camouflage is THE biggest give-away to an enemy. When you look through Night Vision Devices, you see a bewildering array of indistinct shapes. Before you fire or sound the alarm you need certainty. If you are able to not give a distinct shape by camouflage "rag top" strips on your "fritz" kevlar helmet, you will have a battlefield advantage. Getting this is the problem.
Consider the magnitude of the problem--dozens of armies now have "fritz" shape kevlar helmets. Including Communist Red China----just because you see a "fritz" shapes does NOT mean its "friendly".


1. Shoot: Notice the Bullpup-style compact automatic weapons. Note the Automatic rifleman has a C-MAG-type drum instead of a belt. A reflex optic is easily mounted to the carrying handle for longer-range target acquisition and accuracy than iron sights. The Grenadier has M203 40mm-type Grenade Launcher. Each man has pouches at the back for 2 stick grenades.
2. Move: The Bullpup weapon's compactness aids in mobility on foot. Notice the better 3-point helmet suspension than our Kevlar PASGT helmets have to keep brim out of the eyes for movement/shooting. All are wearing tactical load bearing vests distributing their weight evenly with less fatigue. All are wearing jungle-boot copies. M9-type wire cutter bayonets standard to close combat and cut wire for mobility. The XT86 was first introduced publicly in 1994 in several different prototypes utilizing different design philosophies and incorporating features of advanced designes of the time. The production T86 was first shown in 1997, and shows design maturity and evolution from the original prototypes. Its design incorporated features found on the US M177, HK, SIG and AUG assult weapons. An integrated scope, interchangable parts with the T65K2, and built in support for the T85 grenade launcher, offered in several variants make this a formidable and versatile assult weapon. The T86 is undergoing series production and is slowly being introduced into service. The Type 95 assult rifle was introduced in 1995 as a vastly improved Type 87. Its shares similarities with the Giat FAMAS bullpup design, and its tactical operation is similar to the British SA80. Polymer materials in its construction help reduce the total weight of the rifle. Its light weight, integrated sight, 5.8mm round, high reliability and versatility makes the Type 95 an accurate and deadly weapon for the PLA.
3. Communicate: no commo gear depicted.
4. Survive: Kevlar helmets providing equivalent ballistic protection as our own. Type 97 uniform has camouflage coloring similar to our own BDUs. Left sleeve has a pocket (good idea). Rank insignia on shoulder epaulets (good idea). Even has Fastex-type quick-release buckles. Where is their water bottles/canteens? Perhaps they will not stray far from their wheeled armored car. No camouflage on face, body or armored car (don't count on it when the shooting starts).
1. Don't expect that if you see the familiar shape of a Kevlar "fritz" PASGT helmet that its "friendly". We must stop allowing our fritz-helmet outlines to show and put ragtop camouflage on our helmets and NOT BE SEEN.
2. Don't expect the enemy only to have AKM-type weaponry or that they cannot shoot to long distances
3. Expect the PLA to have all of the "low-tech" advantages we have.
If you use natural vegetation it will dry off and fall out as you run into and out from the vehicle.
The Israeli Defense Force (IDF) uses a floppy camouflage cover over their helmets to break up its helmet outlines:

When we were more combat-oriented, we used to sew rag-top strips to our helmet covers:
However, if you sew old BDUs cut into strips to your helmet, its costly to get a seamstress to do (about $10-50 per helmet cover depending on who does it for you) and it will work until it starts to fray. If you want to revert to the Garrison-look its tedious to remove the ragtop/helmet cover and put on a parade cover. Also, you have to get everyone in your unit to go to ragtops and there are many who would rather look good in peacetime than be functional for war.

The solution offered by Army veteran Chris Steele of U.S. Cavalry Store is to keep the parade-look helmet cover and cut a piece of vehicle camouflage netting and drape over and attach by black plastic electrical ties to the helmet's inner suspension. THEN----tie strips cut from old BDUs. You can replace the strips if they become frayed and if you want to go "Garrison" you can remove the netting and revert to that look. He used pinking shears to give his BDU strips a ruffled edge more resistant to fraying. If we need to return to the "Garrison" look, you snip the electrical ties and save the camou netting/ragtop for the next FTX. The way to prevent the "Manchu hair" from getting wet and heavy on your head is to use nylon camouflage material, if done as a unit activity some cordura nylon can be ordered and cut into strips. Notice the netting cover is standard issue for the British Para's kevlar helmet depicted to the right of a U.S. helmet with the "Ragtop" added.
If you don't have netting to add, use gutted 550 cord and unused BDU buttons to add connection points for cloth strips using the helmet cover's slots.
www.youtube.com/v/xi3pc0aA-oc


This can be rapidly applied inexpensively to entire Battalions. Ironic, but the WWII Paratrooper netting reborn! The slots in your helmet cover are fine to a point---what we need is a "ghillie" capability to tie cloth strips---what do you think snipers sew to their outfits? Netting.
For your body, tie cut BDU or burlap strips to your LBC/LCE/TLBV/ETLBV etc.
Another "store bought" option is the detachable helmet camouflage system by SABCO.

AFTER

D-12 SHADOW PASGT KEVLAR HELMET COVER - MOUNTED PERSONAL CONCEALMENT
The D-12 Shadow is an innovative approach to concealing one of the largest trouble areas of the human silhouette...the head and shoulders. The Shadow is a 3-Dimensional cover with a pocket built into the perimeter of the headgear which stores two styles of camouflage material. To deploy, the user unsnaps the pocket and allows the material to unfurl. "Leafy" material covers the user's neck / shoulders, which significantly reduces the silhouette of the upper body. A painted mesh material covers the facial area, which prevents the users eyes / face from being seen from the outside but does not hinder visibility or weapon sighting.
This system is ideal for use when a complete Sniper-type ghillie suit concealment system is not feasible. The hat has a secure containment pocket for the camouflage material when deployment is not desired. Once the user wants to deploy the camouflage, the pouches are opened and the material is pulled out and allowed to drape down, removing the silhouette of the upper body. In addition to the concealment capabilities of the system, the 3-D material actually breaks up the shape of either the boonie hat or PASGT kevlar helmet. The system is designed with two separate materials: the face area is constructed of a camouflage painted mesh which can easily be seen through by the user but not from the outside, while the back of the system is constructed of ultra lightweight 3-D camouflage material. These materials work independently, and either can be used by themselves or together.
Made by Sabco Industries, an innovative manufacturer of "concealment systems" for Hunters, Law Enforcement, Military and Photographers.
Description - Item No. Our Price Stock Qty
D-12 SHADOW PASGT RTREE HWG,M - SGK124703 $59.99
D-12 SHADOW PASGT MOSSY S/G,M - SGK125303 $59.99
Brigade Quartermasters LTD. (Mail-Order)
1025 Cobb International Dr NW
Kennesaw, GA 30152
Ph: 770-428-1248, Ext 201
Fax: 770-426-7211
Web: www.actiongear.com
Conclusion
Its time to get our "head into the game" by getting our heads camouflaged so they don't get shot "out of the game". The steps described above can be done by ANY unit in the Army and needs to be on the priority list as high as teaching that class on "sensitivity".
AIRBORNE!