THE CASE FOR THE ECOTAT TENT, MULTI-PURPOSE (TMP)

TMP as One-Man Tent and as an Anorak Short Coat
By Colonel Richard E. Haislip, USMC (Ret) served with the 1st Marine Division
during Vietnam and is currently the president of Ecotat Systems Company.
Ever since Soldiers took to the field, there has been a constant
battle not only with the enemy but also with the weather. Rain, snow, sleet,
heat, cold and insects have all conspired to sap his strength and reduce his
efficiency. Photos of war invariably portray the misery caused by inadequate
protection. World War II. Statistics quantified this terrible loss of
battlefield strength. TWELVE Soldiers were non-combat casualties versus ONE
inflicted by the enemy. Many if not most of these were WEATHER-RELATED.
Analysis of military medical records from our recent wars reveals that twelve
Soldiers are lost from battle for environmental reasons for every one casualty
caused by enemy action. During the Battle of the Bulge, that ration was
seventeen (17) to one (1). Future non-linear battles will be fought with limited
logistics support more similar to the Battle of the Bulge scenario.
Soldiers simply cannot carry into battle all that is needed to fight the
enemy with superior weaponry and ammunition and at the same time carry all that
they need to protect them from the environment or to permit them to rest
efficiently when they are able to. Something has to go, and its usually his
rucksack/backpack that is dropped off before going into battle.
Some current items in the inventory, designed for this purpose are the
poncho, shelter-half, sleeping bag cover, rain suit, parkas, field jacket and
others. Unless the Soldier is wearing his parka or jacket, only the poncho is
usually included on his actual battle harness. Too often the Soldier in battle
finds himself separated from his rucksack/backpack, let alone the logistics
support for items needed to sustain him in the field. If he tries to carry his
rucksack/backpack into battle, he will be immobile and the enemy could
outmaneuver him or simply get away, as was the case recently in Afghanistan.
We can improve these statistics by increasing the means of protection,
increasing logistical support and reacting more quickly to fatigue and exposure
by withdrawing men to aid stations and treating them. However, none of these
solutions are viable as they detract from the combat power needed to win in
battle. Increasing protection by adding items is not viable. The Soldier load is
already too great - over 100 pounds for a rifleman. We have had to decrease
logistical support, transportation and support personnel in order to increase
foxhole strength. During the Battle of the Bulge, when lines of logistical
support were minimal or non-existant, the non-combat casualty rate escalated to
17 to 1. These are the probable future casualty rates that the military could
experience in non-linear operations unless we find an answer.
WE HAVE AN ANSWER.
The Ecotat Tent, Multi-purpose (TMP).
THE ECOTAT TENT MULTI-PURPOSE (TMP) CONCEPT OF USE
Here's how the Ecotat Tent, Multipurpose (TMP) can help provide a
solution.

TMP as Great (Long) Coat
Why the TMP?
First, it allows the Soldier to perform his combat mission with significantly
increased protection by modern design. For example, the current shelter-half and
poncho designs are almost unchanged after a century of use and apparent
shortcomings. The TMP has been successfully tested in climates ranging from
tropical to arctic and in varying environments from jungle to urban. Tests done
at the U.S. Army Proving Grounds, Aberdeen, MD showed that the TMP could
withstand winds up to 45 miles per hour and rain up to a rate of 4 inches per
hour. It has also been tested and used by members of the U.S. Army 10th and 11th
Special Forces Groups at numerous training locations in the United States,
Panama, Norway and Finland. Field user tests were conducted by members of the
4th Marine Division and elements of the 1st and 2nd Marine Division used the
system at Camp Lejeune and while serving in DESERT STORM. Properly used TMP can
therefore provide protection for the Soldier during the conduct of his
battlefield tasks.
To do this the water and wind-proof TMP efficiently traps body heat keeping
the Soldier warm and dry. It's design, unlike the poncho, protects the Soldier
a full 360 degrees.
Staying dry when Soldiers must be exposed to the weather during extended
periods of time is a must. The Ecotat TMP does this the best. Even if a parka or
jacket is water-proof, the wearer will suffer significant heat loss. These
garments expose a lot of surface area to the elements. Water penetrates the
surface fabric and is constantly evaporating. During this process, heat is drawn
away from the body. The Ecotat TMP provides an air layer beneath its shell that
significantly tempers heat loss and keeps the parka or jacket and trousers dry.
Should military necessity preclude the donning of the TMP and the outer garments
do get wet, donning the TMP creates an efficient insulating air layer. This both
speeds the drying process and retains much greater amounts of heat near the
body.
Currently, we try to stay warm by trapping as much dead air as we can with
insulating layers. The amount of insulation you need is dependent on air
temperature, wind speed, physical activity and individual metabolism. These are
the basic variables we must deal with. All of us have experiences being too warm
on a march but too cold in a rest position. The current solution is to vary the
layers of insulation. To make this easier, designers have come up with a
bewildering array of snaps, buttons and zippers. Ever try to change underwear in
a driving rainstorm? It's easy with the Ecotat TMP! The TMP is an outer
garment, easy to put on and take off.
In addition to being water and wind-proof, the TMP is designed to do two
things; trap air and ventilate. The two are a must to overcome the vagaries of
the weather. The TMP is intentionally large to allow large volumes of air to be
trapped in comparison to a traditional parka and trousers. The cape, used by
armies for centuries, provides back and wrap around protection. It serves to
keep the backpack dry and permits air to circulate around the body. When more
warm air needs to be trapped, sleeves can be snapped shut.
The hood opening goes deep into the chest area. This allows heat from the
body to escape. If more heat needs to be retained, as simple tug on the draw
cord closes off as much as or as little ventilation as you need.
We know that we need more insulation in a stationary mode than in a dynamic
mode. The Ecotat TMP accommodates this with the sit shelter for reading a map
with a flashlight at night without revealing your presence to the enemy or tent
configuration.
As noted earlier, the Soldier must protect himself under all kinds of
conditions - fighting, marching, skiing, posted as a sentry, sleeping or just
resting. For example, when moving and added protection is required, the great
coat configuration is the solution. There are several armies, well prepared for
winter warfare, that use a great coat.
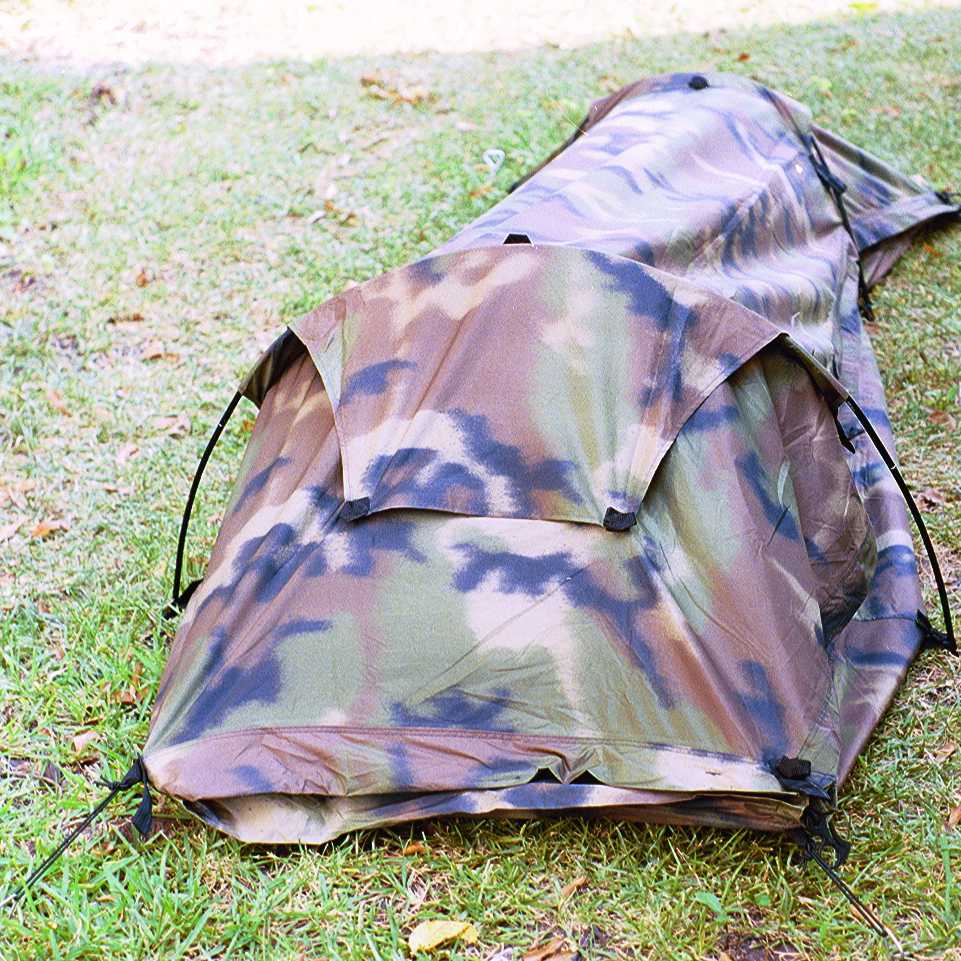
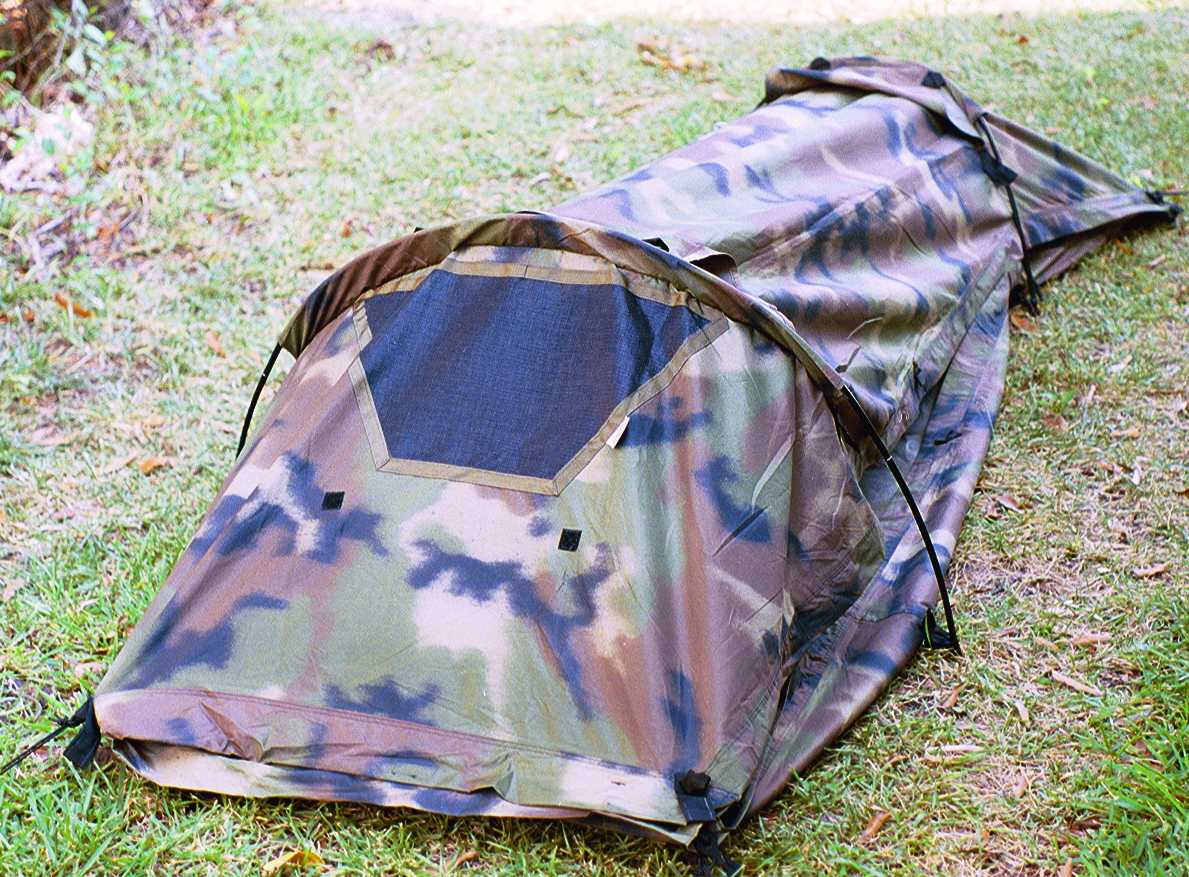
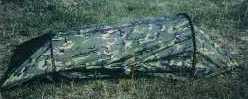
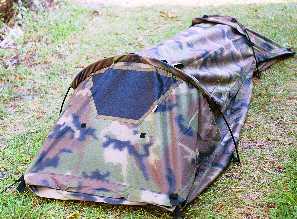
We call the Ecotat TMP a true tactical tent because it can be used anywhere.
As a tent, no opening is less than 3 inches above the ground. This means you can
pitch it in defilade - anywhere. You can control dispersion. Put two together
and you have room for three. With accompanying mosquito netting zipped in, the
TMP maximizes ventilation and protects the Soldier from disease causing insects
in the warmer climates, a major concern with enemies preparing to use Nuclear,
Biological and Chemical (NBC) attacks on our Soldiers.
The September issue of Army Times reports recent
After Action Reviews of recent Afghanistan combat by the 10th Mountain Division
reveal the enemy is using blankets to provide camouflage to hide from American
firepower:
"The enemy moved in small groups of three to five fighters, making
them hard to spot. "During the daylight, we watched them on the
Predator," Hagenbeck told Field Artillery. "At night, when these
groups heard a Predator or AC-130 coming, they pulled a blanket over themselves
to disappear from the night-vision screen. They used low-tech to beat
high-tech."
The Ecotat TMP and LWSB-MP could also be used as instant camouflage in the
same manner by U.S. forces!
TMP as SUMMER TENT

TMP as WINTER TENT
In summary, the Ecotat TMP is:
VERSATILE. You can wear it or sleep in it. The TMP is better at
protecting against the rain, wind and cold than a poncho. As a tent, it is
better than a shelter-half. In fact, we believe this is the best one-person tent
available today - anywhere! Put two together and sleep three (3) if you have a
Soldier who has lost his gear in battle.
REDUCED WEIGHT AND BULK. The Ecotat TMP weighs about four pounds and
stows into its own carry bag that is 17 inches long and 5 inches in
diameter--easily strappable to the top of the rear load carrying buttpack.

TMP as instant sit shelter: great for covert map reading with a flashlight
SPEED. The Soldier can set up any of the TMP configurations in a
matter of minutes; the most complex in less than five.
ADAPTABLE. The Ecotat TMP can be used in climates ranging from
tropical to arctic and in varying environments from jungle to urban. With a
summer screen, it is usable in hot weather or, take out the screen and be
completely enclosed for a warm winter tent. You can bivouac in a swamp or rocky
terrain, in rain or snow. The design of the tent - no opening is less than
three inches above ground level - permits a Soldier to bivouac in protected
defilade, under a tree - anyplace.
UNIQUE. When worn, it has a cape that can cover the largest rucks/packs
and your back. For centuries, Soldiers wore a cape for warmth and protection, so
the concept is a proven one.
RELIABLE. The Soldier can carry it with him everywhere. He doesn't
have to rely on a long logistics tail. The material is a 70 Denier 34 filament
nylon for strength and durability and is printed in the woodland camouflage
pattern.
TESTED. The Ecotat TMP has been successfully tested in all
environments from the slopes of Alaska, the tropics of Panama and in the Saudi
desert during Operation Desert Storm. Our TMP has been selected to be included
in the survival kit by the U.S. Army Aviation & Troop Command and is
permanent equipment for all U.S. Marine Corps Reconnaissance Units. The National
Supply Number (NSN) assigned by the U.S. Military is as follows:
NSN 8340-01-360-4427 for the Woodland or Desert Camouflage.
NSN 8415-01-417-4003 for solid colors (Black or OD).
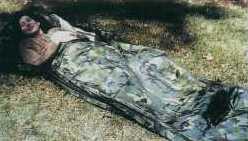
TMP as bivy cover for sleeping bag
COST EFFECTIVE. For a combat Soldier the Ecotat TMP replaces ponchos,
shelter halves, rain suits (optional), sleeping bag covers, and the sleeping
pads if he choses to use natural insulation like leaves under his TMP floor. It
also gives the Soldier a parka (anorak) or great coat to wear when he needs it.
Modern weapons with their extreme accuracy rule out using houses or buildings
for shelter as they are stationary targets and readily identifiable on most
military maps. Shelters that house multiples of five, ten or more troops are
relatively large and inviting targets. A key to survival on the modern
battlefield is dispersion and concealment. The Ecotat Tent, Multi-Purpose, gives
you both.
Conclusion
Whether in action or at rest, the Ecotat TMP provides more functional
capabilities and benefits to the Soldier than are currently available with
current single-purpose equipment - doing this with less expense, weight and
bulk. For the first time in the history of armies, a Soldier can truly be
protected from the environment at the same time he is accomplishing his mission.
Isn't the Ecotat TMP a better choice than a repeat of 17 to 1 exposure
casualty ratios?
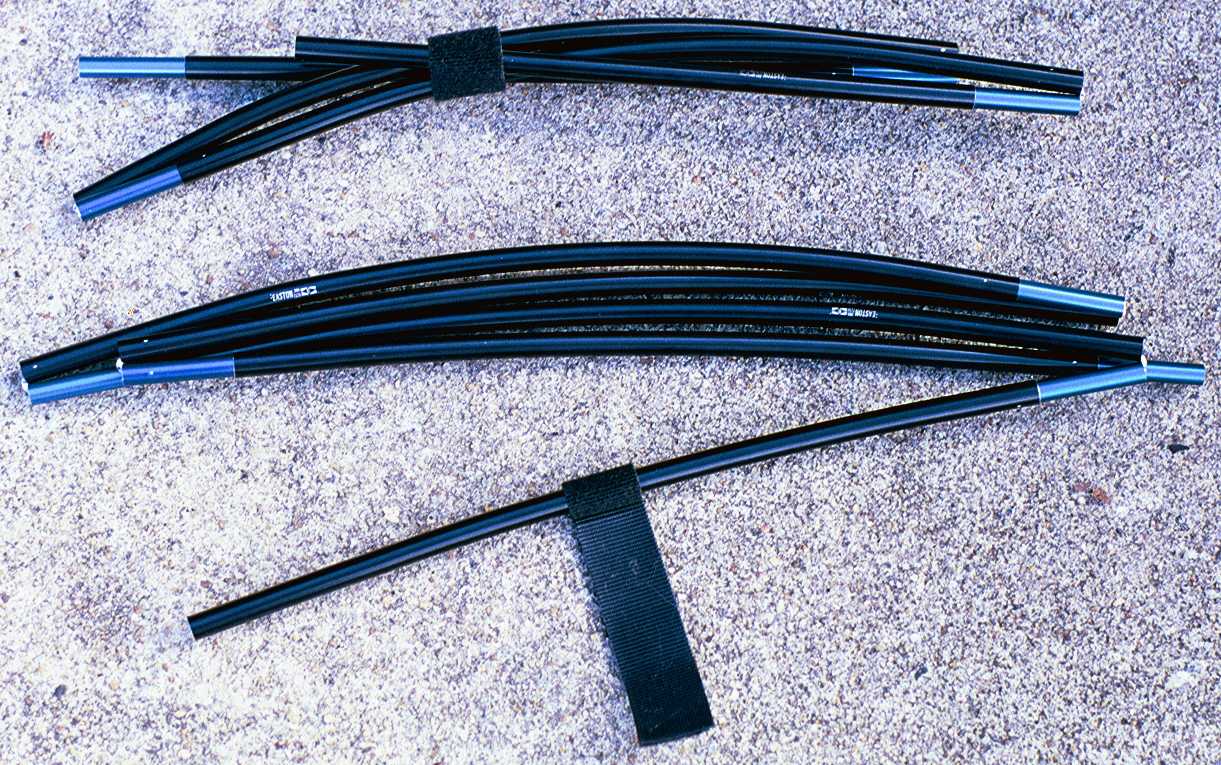
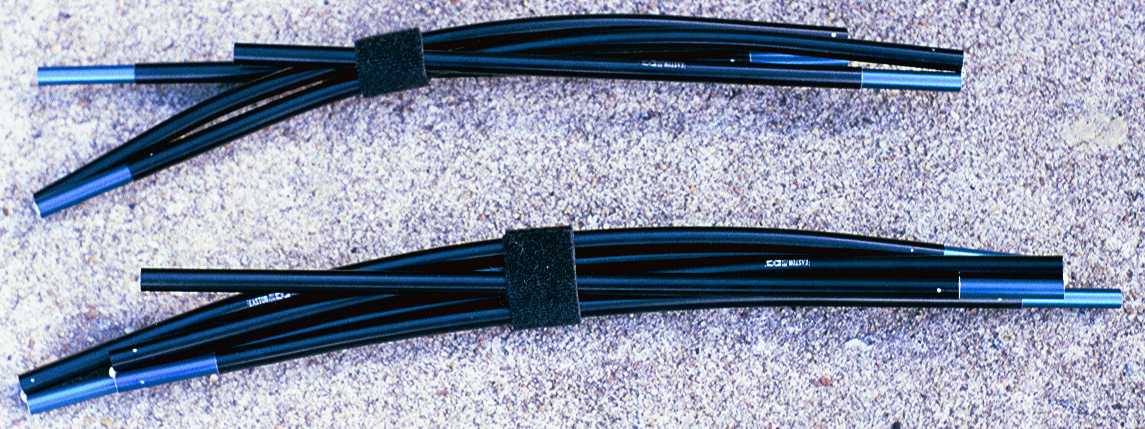
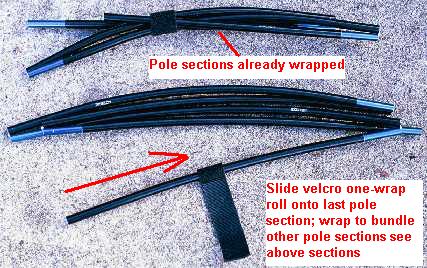
NEW! TMP TIPS: BUNDLING THE TMP'S POLE SECTIONS
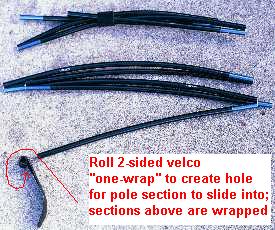
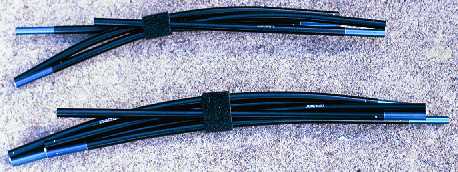
More about Velcro's "One Wrap" 2-sided velcro fasteners...
Velcro USA. (800) 872-2884.
www.velcro.com/industrial/one.html
ONE-WRAP(r) Brand Fasteners
Reusable and flexible, patented ONE-WRAP(r) brand self-gripping fasteners are
a unique back-to-back fastening system. ONE-WRAP(r) brand straps wrap around
objects to be bundled or controlled, and then the remaining strap tip attaches
back onto itself for a neat and secure closure without buckles or hardware.
Operating temperature range: 0 to 220ºF.
ONE-WRAP(r) brand Self-Gripping Straps:
Ideal for cord and cable control
Great for network installations
Can be slit, perforated and die-cut to meet specific requirements
Can be cycled (opened and closed) hundreds of times
Available in 11 standard colors
Ideal for electrical & network color-coding
Email us at marketing@velcro.com.
www.velcro.com/CONSUMER/index.html
ONE-WRAP(r) brand Work straps from Velcro USA Inc. let you tie up those loose
ends. Package of 6 straps each comes in three lengths, 6", 11" and
15" and two colors, red and green. Ideal for all bundling, strapping and
coiling tasks!
TENT, MULTI-PURPOSE (TMP) LIGHTWEIGHT "FREEDOM SHELTER".
This is a tent that can also serve as a long or short coat, poncho, sit
shelter, sleeping bag cover, bivouac sack A-frame tent, lean-to, field expedient
rescue litter, tarp or an emergency body bag.
The shelter may be used as a one person tent or two may be joined to
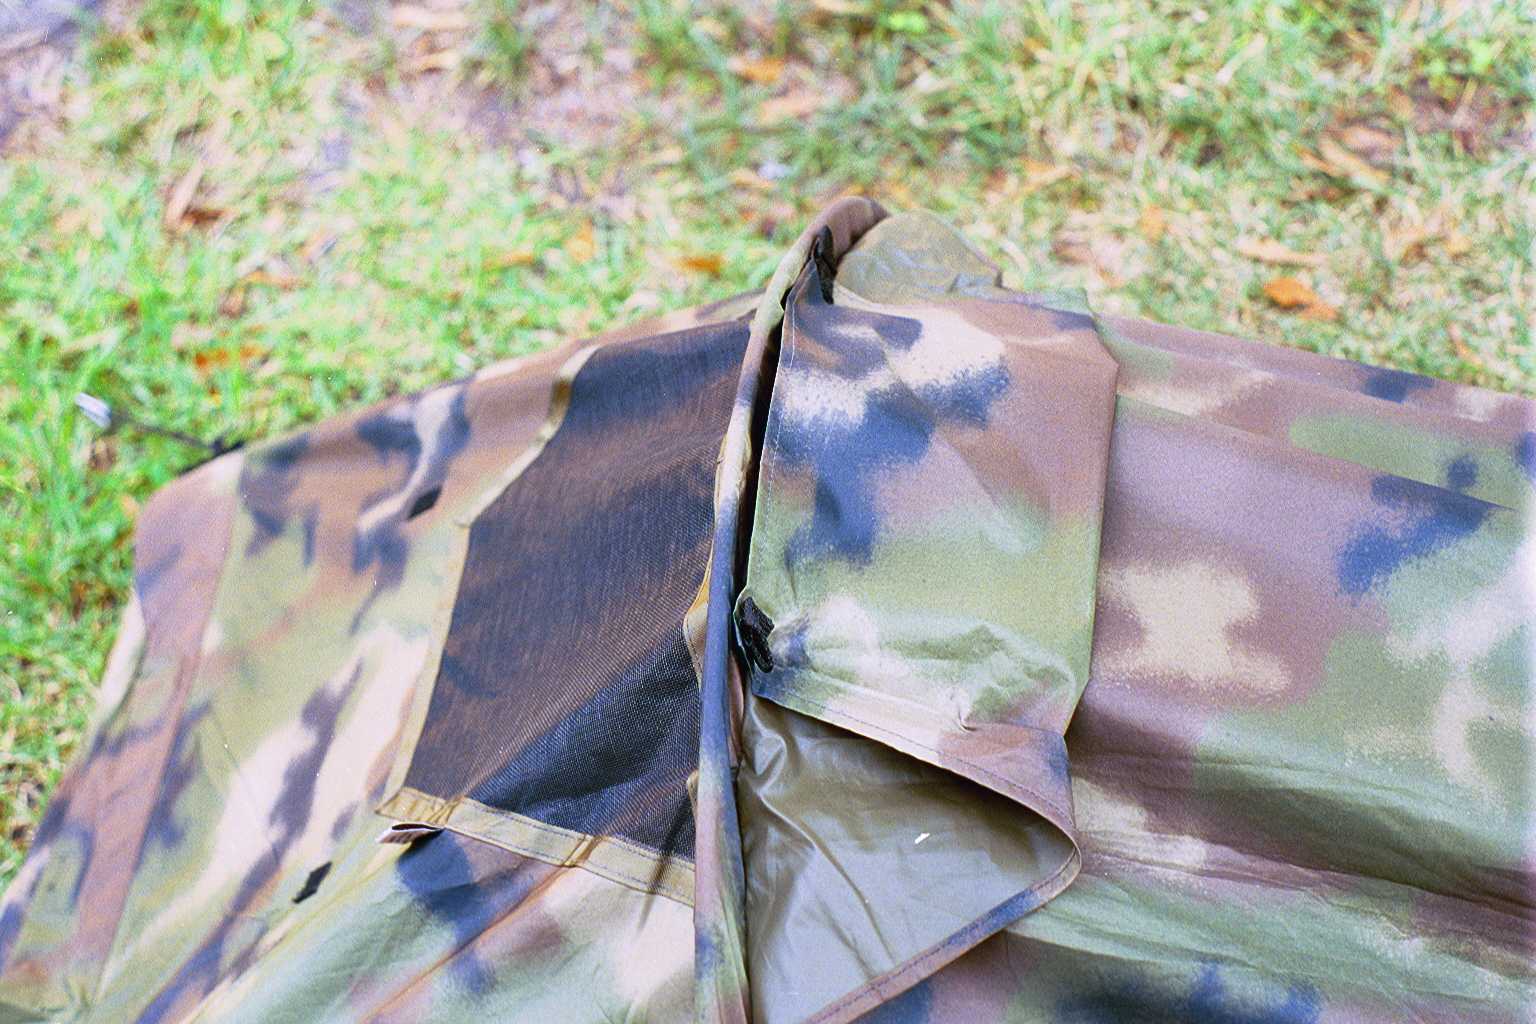
accommodate three people. The all-season tent comes with a mosquito net that
zips in one side for those hot summer nights. Two vents provide additional air
circulation if needed to control condensation.
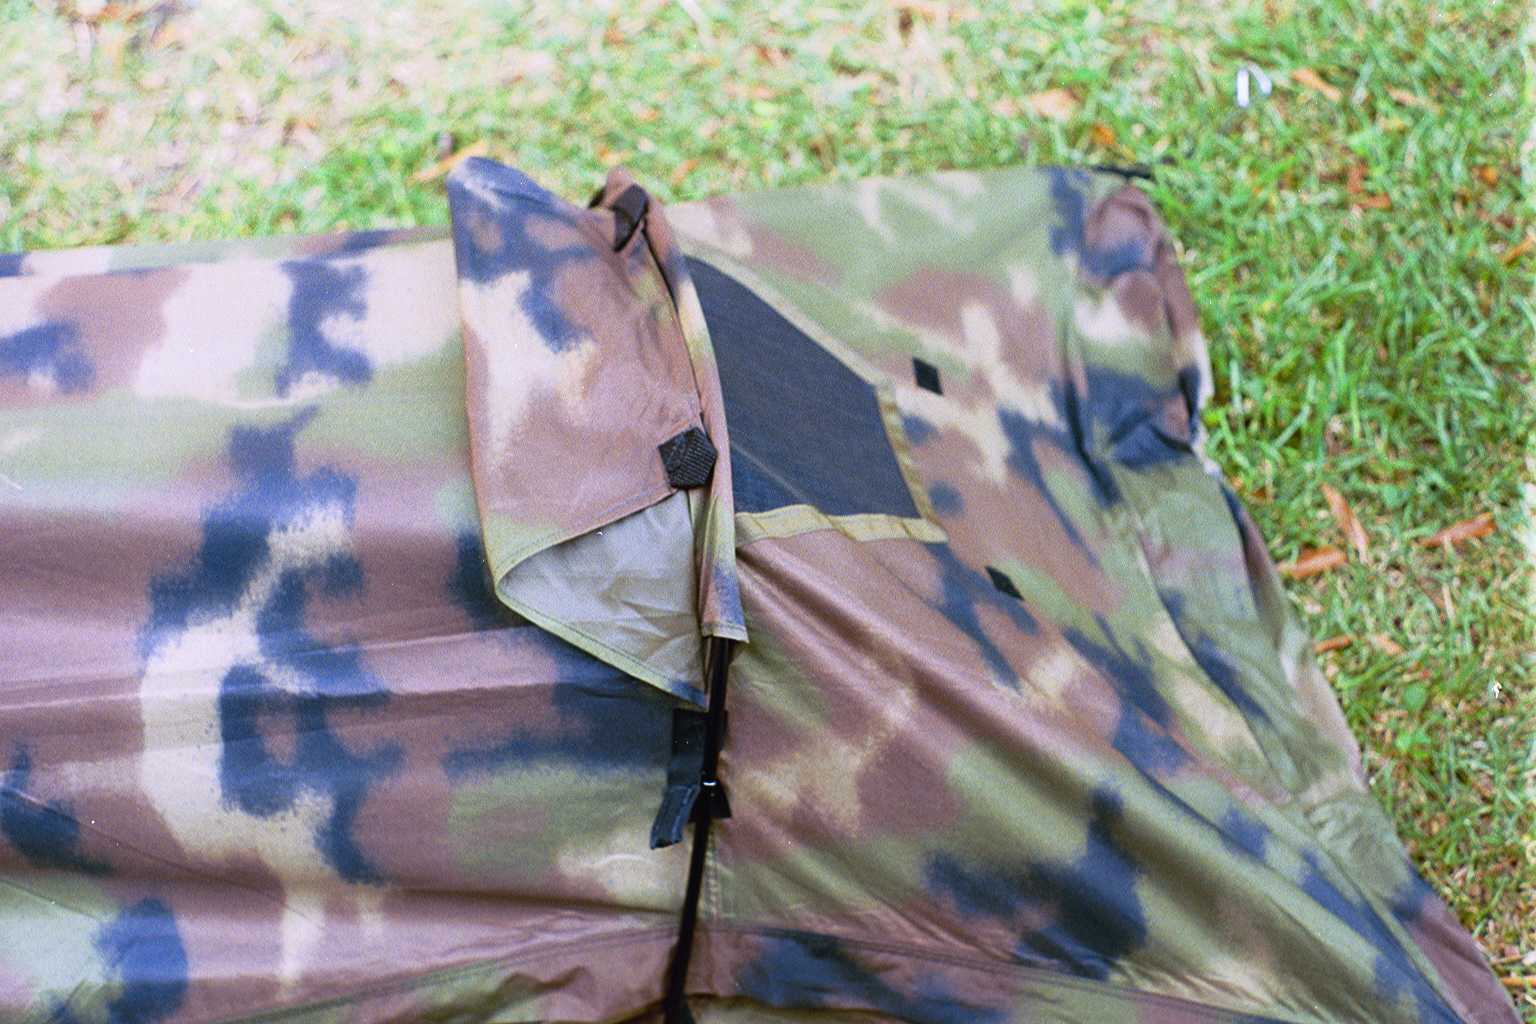
TMP VENTILATION
FOOT END VENT

HEAD END VENT

The TMP "Freedom Shelter" is made with the latest waterproof
and dire retardant fabric. All seams are factory taped to prevent leaks. The
total weight, including aluminum shock corded poles, stakes and carry bag is
four (4) pounds/1.8 kilograms. It rolls to a compact size of only 5" x
17" / 12.75cm x 44 cm.
The national supply number assigned by the U.S. Military is NSN
8340-01-360-4427 for camouflage colors (Woodland Green or Desert) and NSN
8415-01-417-4003 for solid colors (Earth Brown or Black.)
ECOTAT TENT MULTI-PURPOSE (TMP) "FREEDOM SHELTER"
NSN 8340-01-360-4427 (Camo colors)
NSN 8415-01-417-4003 (Solid colors)
TECHNICAL SPECIFICATIONS
|
Fabric:
|
100% Polyester warp and filling. 70 Denier 34 filament. Weight 2.1
oz./per sq yd. Grab Tensile -- pounds -- warp 90 x fill 50. Trap Tear --
pounds -- warp 9x fill 8. Coating is a three pass systems of an
aliphatic urethane solution which is waterproof and fire retardant.
|
|
Colors:
|
Solid Color (Block or OD) & Camouflage.
|
|
Size:
|
Tent = 8 feet / 2.45 meters long x 38 inches / 93 centimeters wide x
24 inches / 62 centimeters height. Rolls to 17 inches / 43.4 centimeters
long x 5 inches / 12.9 centimeters in diameter.
|
|
Weight:
|
Approximately 4 pounds / 1.8 kilograms in carry bag.
|
|
Poles:
|
Shock-corded Easton pre-bent aluminum alloy 7075W with T9 temper
(96,000 PSI) tensile strength.
|
|
Stakes:
|
Tough, lightweight 7 1/2" wire skewers stakes.
|
|
Screen
|
Nylon no-see-um-netting summer screen.
|
|
Zippers:
|
YKK # EYE-855L Coil 2 way w/double non-locking pulls for side and1
single pull slider at the bottom. Two YKK # Coil w/ double auto-lock
slider for the ends.
|
|
Shock-cord:
|
Nylon wound, withstands temperatures to -20F/-29C.
|
|
Seam:
|
All major seams are safety stitched then double needle lock-stitched.
All seams factory hot taped.
|
|
Webbing:
|
Tight weave Nylon or Polypropylene.
|
ESSENTIAL CHARACTERISTICS
FOR
ECOTAT TENT MULTI-PURPOSE "FREEDOM SHELTER"
(NSN 8340-01-360-4427 / Ecotat Part #79905)
|
1.
|
Constructed of a water-proof/vapor permeable/fire retardant coating
material and designed to ensure a minimum internal buildup of
condensation.
|
|
2.
|
Weigh no more than 4.0 pounds.
|
|
3.
|
Full bathtub floor.
|
|
4.
|
Withstand winds up to 45 knots.
|
|
5.
|
Well ventilated 4 season design.
|
|
6.
|
Capable of closing vents.
|
|
7.
|
Be capable of quick and easy entry and have at least three (3) exits.
|
|
8.
|
Provide for protection against insects (flying and crawling)
|
|
9.
|
Possess a zipper attached mosquito net.
|
|
10.
|
Is no more than twenty-four (24) inches high.
|
|
11.
|
Requires no special tools for erection and striking and can be easily
and quickly erected and struck by one person.
|
|
12.
|
Has the capability of being joined with another TMP "Freedom
Shelter" to form a 3-man shelter.
|
|
13.
|
Is made of material that is not harmful to skin and/or wounds.
|
|
14.
|
Is made of material that does not constitute a thermal hazard.
|
|
15.
|
When in over-garment mode of operations, possess the following
multi-purpose functions:
|
| |
a.
|
Cagoule (Great Coat).
|
| |
b.
|
Anorak (Short Coat) with cape.
|
| |
c.
|
Poncho
|
| |
d.
|
Sleeping Bag Cover.
|
| |
e.
|
Bivy-Sack
|
| |
f.
|
Tarpaulin.
|
| |
g.
|
Rescue Litter.
|
| |
h.
|
Lean-to.
|
| |
i.
|
Be capable of making into a 8x6 foot long Air Marker Panel.
|
| |
j.
|
To completely enclose a person in the sitting position.
|
| |
j.
|
Expedient Camouflage Cover to avoid enemy detection
|
The Ecotat Tent, Multi-Purpose "Freedom Shelter": Care and Instruction
Booklet
Preferred by people who take their outdoor living seriously!
Protected by U.S. and Foreign Patents
Your Ecotat Tent, Multi-Purpose "Freedom Shelter" (TMP) system
comes complete with:
- Ecotat Tent, Multi-Purpose "Freedom Shelter"
- Shelter head poles and foot poles (shock-corded)
- Extra 2 poles for use with mosquito net
- 4 tent pegs
- 4 tie loops
- Mosquito net
- Pole Bag
- Shelter Bag
|
TABLE OF CONTENTS
|
| |
|
Page
|
|
Section I:
|
Features..........................................................................................
|
2
|
|
A.
|
Location of Features.......................................................................
|
2
|
|
B.
|
Precautions to be Observed by the
User........................................
|
4
|
|
Section II:
|
Operating Procedures.....................................................................
|
5
|
|
A.
|
One-Person Shelter........................................................................
|
5
|
|
B,
|
One-Person Tropical
Tent...............................................................
|
10
|
|
C.
|
Three-Person Shelter......................................................................
|
14
|
|
D.
|
Sleeping Bag Cover........................................................................
|
20
|
|
E.
|
Sit Shelter........................................................................................
|
22
|
|
F.
|
Long Coat........................................................................................
|
24
|
|
G.
|
Short Coat.......................................................................................
|
28
|
|
H.
|
Poncho............................................................................................
|
31
|
|
I
|
Other Uses......................................................................................
|
34
|
| |
1.
|
Expedient Litter........................................................................
|
34
|
| |
2.
|
Lean-To...................................................................................
|
35
|
| |
3.
|
Vee-Top...................................................................................
|
35
|
|
Section III:
|
Do's and
Dont's...............................................................................
|
36
|
|
Section IV:
|
Care and Cleaning
Instructions.......................................................
|
37
|
The Ecotat Freedom Shelter
Operating Instructions
Section 1.
1-1 Features
a. Location of Features. Features of the Ecotat Tent Multi-Purpose Freedom
Shelter are shown in Figures 1-1 through 1-4.
Figure 1-1 Freedom Shelter (FS) Top View
Figure 1-2. Freedom Shelter (FS) Bottom View
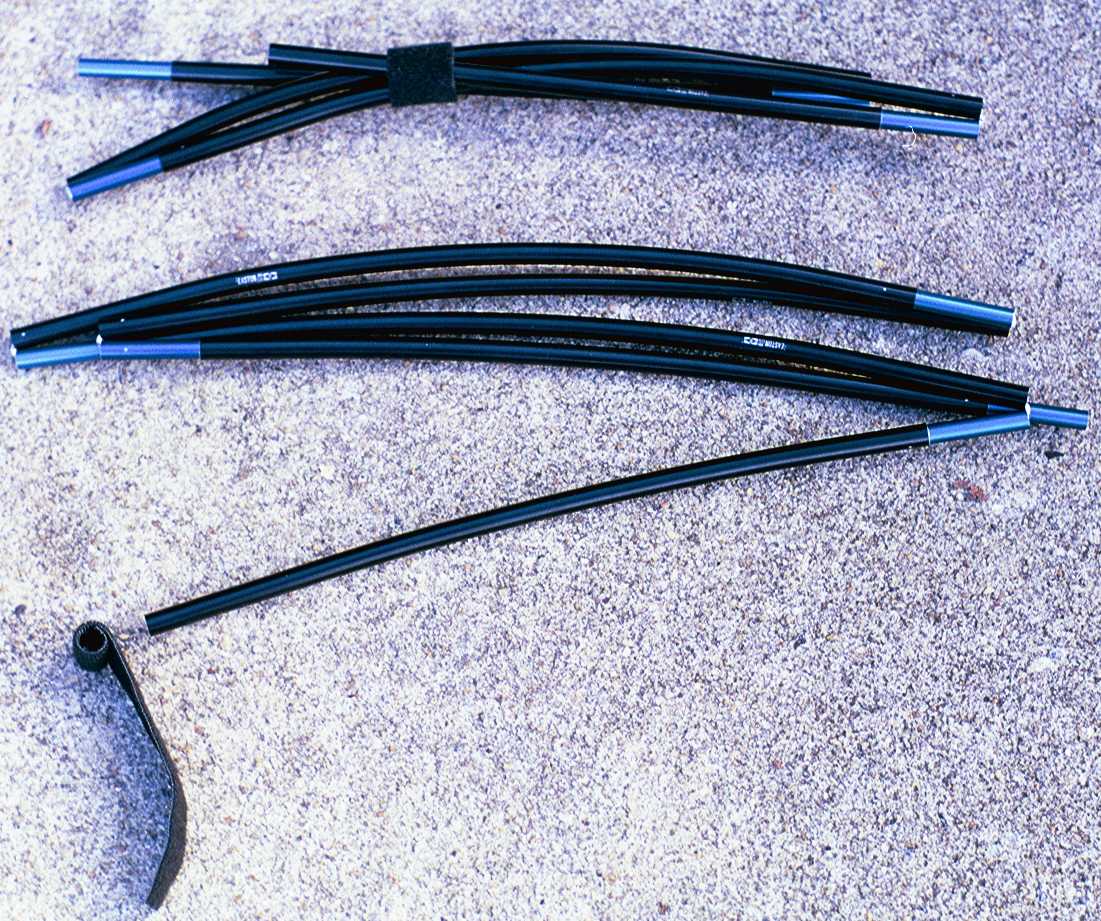
Figure 1-3 Shelter Set Parts
Figure 1-4 Shelter Poles and Extensions
b. Precautions to be observed by the Operator
Use a thick layer of leaves, pinestraw or like material or a foam sleeping
mat to separate your shelter from the earth to prevent the loss of body heat.
Never completely enclose yourself in the shelter. This is especially
important at high altitudes.
Never use an open flame, air-contaminating or oxygen consuming device inside
the shelter
Do not overstress the tie loops, corner anchor loops, zippers, draw cords or
poles. The "Freedom Shelter" (FS) is designed for rugged use, but
anything man-made is destructible.
Section II. Operating Procedures
1-2 OPERATION AND USE
- One-Person Shelter.
- Close off the hood opening by pulling the hood draw cord in tightly.
Fold the hood opening down and wrap the cord tightly around the fold. Be
sure hood hangs down to avoid the creation of a pocket that will collect
water. Secure with an easy-to-untie knot. (see figure 1-5).
- Zip up the side and both ends of the FS and stretch it to its full
length being sure the vents are on the top. (see figure 1-6)
- Assemble and insert the 5-section pole through the pole sleeve at the
head end. (see figure 1-7). Be sure to put the pole through the pole
loop on the opposite side from the side zipper. Insert end of pole
pocket below loop. (see figure 1-8)
Figure 1-5 Hood Tie Off
Figure 1-6 Zip Side & Ends

Figure 1-7 Slide Pool into Sleeve
Figure 1-8 Insert thru Loop and into Pocket
Arch the pole and insert other end into pole pocket below
the zipper. Do not attempt to put the pole in the pole pocket above the
zipper. (see figure 1-9). Repeat the procedure for the foot end using the
4-section pole.
Figure 1-9. Arch and Insert Pole
- Attach a tie loop to each top corner and center seam anchor loop. Stake
pegs thru the tie loops at each corner at about a 30 degree angle, making
the FS taut over the ground. (See figures 1-10 and 1-11).
 Figure 1-10. Attach Tie
Loop
Figure 1-10. Attach Tie
Loop
 Figure 1-11. Stake
Shelter Pegs
Figure 1-11. Stake
Shelter Pegs
- For additional strength or as an alternate method of support, other
suitable lines can be used to anchor the shelter from the head and foot
end apex anchor loops (such as to a rock or adjacent tree, etc.).
- Open vents by separating the top and bottom until the vent springs open
(see figure 1-12).
Figure 1-12 Open vent
Figure 1-13. FS as a one person shelter
- One Person Tropical Tent.
- Close off the hood opening by pulling the hood draw cord in tightly.
Fold the hood opening down and wrap the cored tightly around the fold. Be
sure hood hangs down to avoid the creation of a pocket that will collect
water. Secure with an easy-to-untie knot. (see figures 1-14 and 1-15).

Figure 1-14 pulling on hood draw cord

Figure Hood 1-15 tie off
- Unzip the side zipper and zip the ends closed. (See figure 1-16). Join
the netting zipper to each side of the long zipper. (see figure 1-17).
Ensure that the double sliders are fully seated when attaching the
mosquito net to the shelter. Zip the net into the FS about half way,
allowing room to enter the FS at the head end before completely zipping
the FS from the inside.

Figure 1-16. Lay out netting

Figure 1-17. Insert Netting
- When the mosquito netting is used, an extra pole section must be used in
both the foot and head end poles. (see figure 1-18). Assemble and insert
the 5-section pole through the head end pole sleeve and loop on the
opposite side from the side zipper. Insert end of pole into pole pocket
below loop and add extra pole section. Arch the pole and insert other end
of pole into pole pocket below the zipper. (see figures 1-19 and 1-20).
Repeat procedure for the foot end using the 4-secion pole assemble.
Note: The mosquito net pocket should be on the inside of the shelter when
the net is attached.

Figure 1-18 Attach Pole Extension

Figure 1-19 Insert Pole into Pocket

Figure 1-20 Side view, netting installed .
- Secure a peg and line to each corner tie loop. Stake pegs at about a 30
degree angle on each end, making the FS taut.
- Three-Person Shelter (Two shelter sets configured as described below will
provide adequate combined shelter space for three persons.)
- Unzip ends and sides of both FS's. Lay bottom FS with outside fabric
facing the ground. This bottom FS will form the floor of the three-person
shelter. (see figure 1-21). If attached, remove all tie loops from the
bottom FS. Lay the top FS on top of the bottom FS with the outside fabric
facing up. (see figure 1-22). This top FS will form the roof of the 3-man
shelter.

Figure 1-21. Lay out bottom freedom shelter.

Figure 1-22. Lay out top freedom shelter
- Attach two tie loops, end-to-end, to the foot-end center seam anchor loop
of the top FS. Repeat the procedure with two tie loops at the head end.
Attach one tie loop to each corner of the top FS. Do not attach tie loops to
the bottom FS. Zip together both FS's at all sides and ends. (see figure
1-23).

Figure 1-23 Zip freedom shelter together
- Join both sets of 5-section pole assemblies for the head end of the
three-person shelter. (see figure 1-24). Tie off the hood openings for storm
proofing.
- Thread the poles through the head-end pole sleeves and pole loop. (see
figures 1-25 and 1-26).

Figure 1-24. Combine Pole Sets.

Figure 1-25 Insert into sleeve.

Figure 1-26. Insert into next sleeve.
- Insert one end of the joined pole assemblies into the bottom
("floor") FS pole pocket on one side of the FS (just below the
side zipper). At the other end of the joined pole assemblies pull out and
fold back the last section of the pole before inserting into the pole pocket
below the zipper on the opposite side of the FS. (see figure 1-27). Join
both sets of 4-section pole assemblies and install in the foot end in the
same fashion as above.
 Figure 1-27. Fold back pole and insert
- Use one peg thru each corner's tie loop and one at each end of the
shelter's centerline tie loops (doubled end-to-end) and stake at about a 30
degree angle. (see figures 1-28, 1-29 and 1-30).
Figure 1-28. Foot end pegs

Figure 1-29. Center tie loops

Figure 1-30. Head end pegs.
- Sleeping Bag Cover
- Close off the hood opening of the FS by pulling the hood draw cord in
tightly. Fold the hood opening down and wrap the cord in tightly. Fold the
hood opening down and wrap the cord tightly around the fold. Secure with an
easy to until knot. (see figure 1-31 and 1-32).

Figure 1-31. Pulling on hold draw cord

Figure 1-32. Hood tie off
- Place Sleeping bag in the FS and close zippers at foot end and side. After
you are in the sleeping bag the head end opening for ventilation. (see
figure 1-33).
Note: For additional storm-proofing of the FS, pull the draw cord from the
foot end zipper flap, compress the end and wrap the cord around the shelter as
close to the end as possible.

Figure 1-33. Sleeping bag cover
- Sit Shelter
- Unzip the head and foot end of the FS. Close the side zipper up to the
first velcro patch from the foot end. Note: The fit of the sit shelter
will be determined by this zipping; therefore, you should experiment with
this step to assure a proper fit.
- With the zipped side facing you and the foot end toward the ground, hold
the FS near the hood opening and step into the FS as if putting on a pair
of trousers. (see figure 1-34). Put your head through the hood opening
(see figure 1-35).

Figure 1-34. Step into FS

Figure 1-35. Head through hood opening.
- Flip remainder of FS over your shoulders so as to form a cape and sit
down. (see figures 1-36and 1-37).

Figure1-36. FS over shoulders

Figure 1-37. FS in the sit shelter
Note: This configuration can be used for changing clothes in
the field rain or snow.
- Long Coat
- Unzip the head and foot ends of the FS. Close the side zipper up to the
first velcro patch from the foot end. Note: The fit of the long coat will be
determined by this zipping; therefore, you should experiment with this step
to assure a proper fit.
- With the zipped side facing you and the foot end toward the ground, hold
the FS near the hood opening and step in the FS as if putting on trousers.
Put your head through the hood opening and flip remainder of FS over your
shoulders so as to form a cape (see figures 1-38 and1-39).

Figure 1-38. Step into FS

Figure 1-39. Head through hood opening.
- From both the right and left draw cord sleeve pocket ends, reach in with
finger and pull out the draw cord. Pull the cord so that the FS draws snugly
to your waist. (see figure 1-40).

Figure 1-40. Pull draw cord around waist.
- Pull the draw cord around your waist to form a belt and cinch it for a
snug fit. Tuck the extra fabric to the back of your waist and tuck the
excess cord under the waist cord. (see figure 1-41). Note: when pulling the
draw cord, be certain to pull most of the cord from the side without the
cinching device.

Figure 1-41. Form belt and cinch hook.
- Form sleeves by using the velcro patches along the edge of the FS on each
side. (see figure 1-43).

Figure 1-42 Form Sleeves

Figure 1-43 FS as a long coat
- Short Coat
- Unzip the head and foot ends of the FS. Close the side zipper up to the
first velcro patch from the foot end.
- With the zipped side facing you and the foot end toward the ground, hold
the FS near the hood opening and step into the FS as if putting on a paid of
trousers. (see figure 1-44).
- Put your head through the hood opening and flip remainder of the FS over
your shoulders so as to form a cape. (see figure 1-45).

Figure 1-44. Step into the FS

Figure 1-45. Head through hood opening.
- With both hands inside the FS, reach down and grasp the bottom hem. (see
figure 1-46). Pull the bottom inside and up so the draw cord sleeve is at
your waist. The draw cord sleeve end openings are now at the back of your
waist.

Figure 1-46 Grasp bottom hem
- Reach in the draw cord sleeve end openings with finger and pull out the
draw cord. Cross the draw cord ends behind your back and pull them snug
around the waist. (see figure 1-47).

Figure 1-47. Grasp Cords behind back

Figure 1-48 FS as a short coat
- Installing the Ecotat Light Weight Sleeping Bag Multi-Purpose into the FS
for wear as an insulated Poncho.
- Unzip the side, head and foot ends of the FS. Lay FS with outside fabric
facing ground (see figure 1-49).
- Unzip sleeping bag and place on top of FS with the outside fabric facing
the FS and the head end of the sleeping bag at the end of the FS (see figure
1-50).

Figure 1-49 Lay out bottom FS

Figure 1-50. Install sleeping bag
- Zip up the left side of the sleeping bag to the FS. Repeat procedure on
the right side. (see figure 1-51).
- Raise the FS/Sleeping bag from the ground by grasping both sides of the
hood opening. (see figure 1-52).

Figure 1-51. Zip in Ecotat sleeping bag

Figure 1-52. Grasp hood openings.
- Put your head through the hood opening of the FS/Sleeping Bag and flip
remainder of FS/Sleeping Bag over your shoulders so as to form a cape. Lower
the hood opening down to your neckline (see figure 1-53).
- A shock cord can be use to dress-down the FS/Sleeping Bag for a better fit
and to gather material neatly around the waist. (see figure 1-54).

Figure 1-53. FS with the Ecotat Sleeping Bag

Figure 1-54. Optional Poncho belt
Note: The Ecotat Light Weight Sleeping Bag Multi-Purpose hood (if present
some models don't have hoods) should be on the back side as you stand. The
affords added warmth to the lower back and serves as a cushion when sitting.
- Other uses for the Ecotat Freedom Shelter
- Expedient MEDEVAC Litter.
- Zip up the side and head end of the Freedom Shelter
- Run two long poles through the length of the Freedom Shelter sides. (see
figure 1-55).
Figure 1-55. Insert long poles
- Lean-To.
- Unzip the side and both ends of the Freedom Shelter. Select an area near
and upright support such as two trees about 10 feet to 12 feet apart.
- Tie off the Freedom Shelter hood. Tie a line from each end of the top of
the Freedom Shelter to a tree or support for the height you desire.
- Pull the bottom part of the Freedom Shelter out to the proper distance.
The tie loops and corner anchor loops make anchor points. The Freedom
Shelter poles can help tension and lean-to
- Vee-Top.
- Unzip the side and both ends of the Freedom Shelter.
- Tie off the Freedom Shelter hood. Tie a line from tree to tree at the
height you desire.
- Lay the Freedom Shelter over the line and anchor the sides with the pegs,
brush, etc.
Section III. Do's and Dont's
Do's
- Do learn to use all the standard configurations in sequence in the comfort
of your home and backyard.
- Do use a closed cell form pad, inflatable mattress, thick layer of leaves,
pinestraw or like material to separate your Freedom shelter from the earth.
You'll lose an awful lot of body heat if you don't.
- Do write or call us with any problems or suggestions. Photos help a lot.
We want only satisfied customers.
Dont's
- Don't ever completely enclose yourself in the shelter. Leave spaces to
bring in fresh air and allow stale air and moisture to escape. This is
especially important at high altitudes or if you have respiratory problems.
- Don't overstress the straps, zipper and poles. The Freedom Shelter is
designed for rugged use but everything is destructible.
- Don't use an open flame of any kind or oxygen-consuming devise inside for
any reason.
- Don't be afraid to experiment or use your Freedom Shelter for a wide
variety of uses.
Section IV. Care and Cleaning Instructions
Keep your Ecotat Freedom Shelter as clean and dry as possible at all times.
Never stow wet for extended periods of time.
Most soils can be brushed off when dry. If necessary launder with a mild
soap. Rinse twice to insure all soap residue is removed. When laundering , don't
use hot water or dry in high heat, use cool setting only. The mosquito netting
can normally be washed clean with water only.
Check lines after each use for signs of wear. Remember: giving your Freedom
Shelter reasonable care will lead to a longer life.
---PROTECTED BY U.S. AND FOREIGN PATENTS---
Ecotat Systems Company
2223 Commerce Parkway
Va Beach, VA 23454
Phone number (757) 340-0866
Fax number (757) 340-1270
ecotat@juno.com